How to Add a Logo to Hi-Vis Vests Without Breaking ANSI 107 Compliance
Putting a company logo on a hi-vis vest looks like a simple branding decision, but it touches a safety standard that most buyers never read. A vest is only ANSI-compliant if it keeps a minimum amount of fluorescent background and reflective material visible – and a logo, by definition, covers some of that surface. Get it right and you have a sharp, branded, fully compliant vest. Get it wrong and you have gear that no longer meets the class it was sold as, which matters the moment an inspector or an incident investigator starts asking questions. Here is what the standard actually requires and how to add a logo without crossing the line.
What ANSI/ISEA 107 actually requires
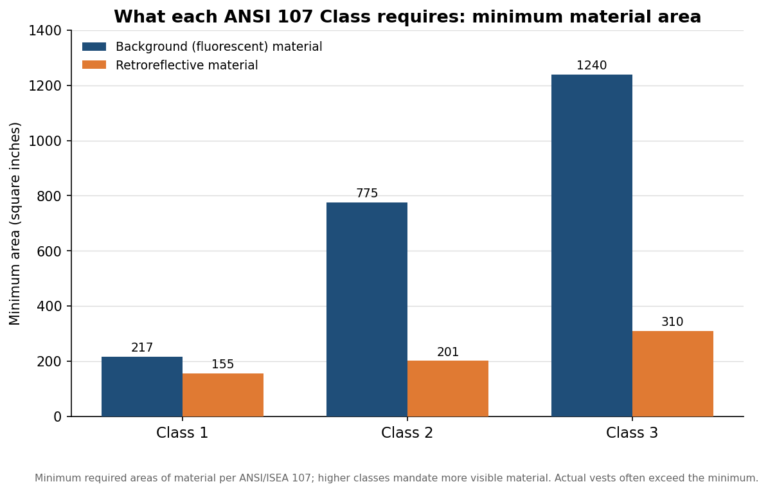
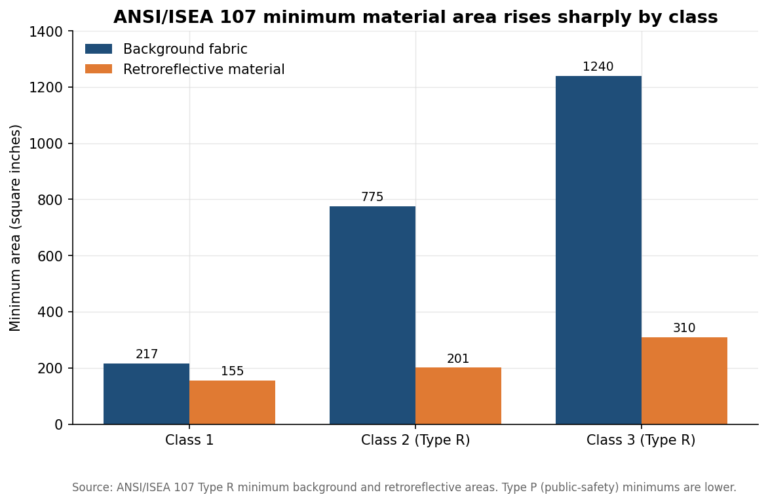
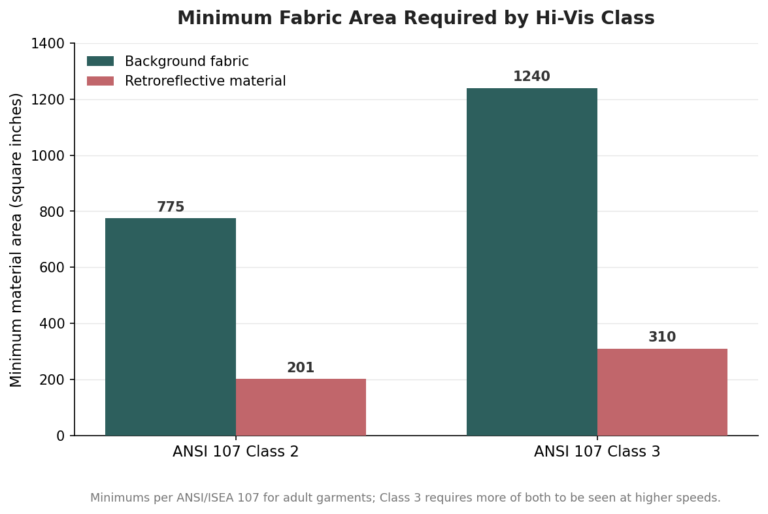
The standard that governs hi-vis apparel in the United States is ANSI/ISEA 107, currently the 2020 edition. For the everyday, stand-still and low-speed environments most vests are worn in – designated Type R – the standard sets minimum areas of two materials: the fluorescent background fabric that makes you conspicuous in daylight, and the retroreflective tape that lights up under headlights at night. Those minimums rise with the class. For the smallest labeled size, Type R Class 1 requires 217 square inches of background and 155 of retroreflective material; Class 2 requires 775 and 201; Class 3 requires 1,240 and 310. Larger garment sizes have to scale those areas up, not just the fabric around them.
There is also a minimum width for the reflective tape itself: 1.38 inches for Class 2 and 2 inches for Class 3, with a 1-inch minimum allowed for split-trim or segmented designs. The chart below shows the material minimums by class, which is the backdrop for every customization decision that follows.

These are floors, not targets. A well-built vest is usually made with some margin above the minimum for its size, and that margin is exactly what you are spending when you add a logo.
How a logo can quietly break compliance
The trap is subtle. When you print a company name in black ink across the back of a lime vest, that printed area is no longer fluorescent background – it is a dark patch. The standard counts only the qualifying fluorescent and reflective material, so a large non-fluorescent logo subtracts from the very area that determines the vest’s class. On a vest built with generous margin, a normal logo makes no practical difference. On a vest that was sized right at the Class 2 minimum, a big back print can push the remaining background below 775 square inches, and the garment no longer qualifies as Class 2 even though nothing about the tape changed.
The standard does leave room for design. It states that retroreflective patterns such as logos, design icons, or identification text may contribute to the required area – meaning a logo executed in compliant reflective or fluorescent material can count toward the minimums rather than against them. The problem is only with logos that replace qualifying material with non-qualifying color. That distinction is the whole game.
The background-area budget: will your logo fit?
The practical way to think about this is as a budget. Start from your vest’s actual fluorescent background area for the size you are ordering, subtract the area your logos will cover in non-fluorescent color, and confirm the remainder still clears the class minimum. The illustration below walks through a mid-size Class 2 example: a vest providing roughly 1,000 square inches of background, carrying a small left-chest logo and a larger back logo, still lands comfortably above the 775-square-inch floor.

The numbers in that example are illustrative – your vest’s real background area depends on its cut and size – but the method is exactly right. Ask your supplier for the background area of the specific size you are buying, not a generic figure, and do the subtraction before you approve artwork. If the margin is thin, the fix is usually to move up to a vest with more background material or to shrink the back logo, both of which are trivial to change on paper and expensive to change after a production run.
Decoration methods and how they interact with hi-vis fabric
How the logo is applied matters as much as where. Screen printing is cost-effective and the usual choice for large orders, laying ink directly onto the fabric; it is durable but every printed inch is non-fluorescent, so it counts against your background budget. Heat transfer vinyl gives precise detail and bright color and suits smaller runs, though it can wear faster under repeated high-heat washing, and it too covers background material. Embroidery gives a premium look and excellent durability, but it adds weight and puts needle penetrations through the fabric, which is why it is better suited to jackets and outerwear than to thin vest mesh; on a lightweight vest it is often applied to a separate patch. Sublimation can produce full-color designs without adding a layer, but it works only on lightweight polyester and is less common for vests.
Whatever the method, the standard’s guidance is consistent: the ink or transfer must not reduce the reflectivity of any tape it touches, so decoration should never sit on top of the reflective striping. If a design needs to span a stripe, that is a signal to redesign it, not to proceed and hope.
Placement rules that keep a vest compliant
Placement is where most compliant, good-looking vests are won. The reliable spots are a small logo on the front-left chest, a larger logo on the upper back, and secondary text on sleeves or pockets. The consistent prohibition is to avoid placing anything over reflective tape or across seams, where the tape’s function is compromised and printing tends to distort. Keeping the chest logo genuinely small – a company mark rather than a full paragraph – preserves background area and looks more professional anyway. Reserve the larger footprint for the upper back, where visibility is best and there is usually the most uninterrupted fluorescent fabric to work with.
Do those three things – start from the real background area for your size, subtract your logo coverage and confirm you clear the class minimum, and keep every decoration off the reflective tape – and you can brand a vest freely without gambling on its rating. The standard is not trying to stop you from customizing; it is only insisting that the vest still does its one job of making a worker visible. A logo that respects the background-area budget and stays clear of the tape does exactly that, and gives you a vest that is both unmistakably yours and unmistakably compliant.